Update: Some people requested details on the LED replacement, so I made a new video (on the bottom of this post) to clarify the process.
I tried a keyboard with Cherry blue mechanical switches and I loved the feeling, a couple of weeks later I decided to buy one. As I was about to spend 100 euros on a keyboard, I decided that I might as well pay 20 or 30 more and buy one with backlighting. Backlighting is pretty unimportant on a keyboard, but it does help a bit when using it on dark environments and, let’s be honest, it looks cool…
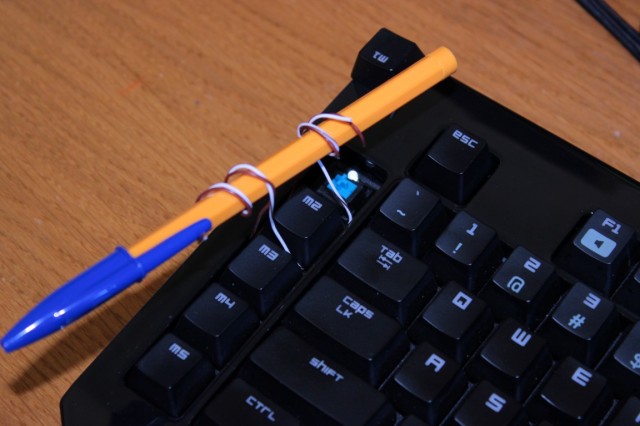
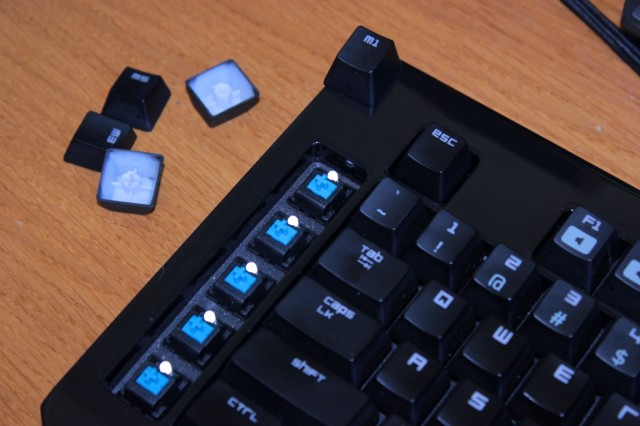
After searching for a bit, the cheaper peripheral that fitted the requirements that I could find was the Razer BlackWidow Ultimate and it also has extra programmable keys, so I picked one up in a store for 120euro (yes, for some reason razer peripherals are sold with a conversion rate of 1USD to 1EUR). During the day it was almost acceptable but, in darker environments, the blue backlight was really unpleasant. I bought a big bag of 3mm white LEDs on eBay (around 5usd), improvised a keycap remover and replaced the blue LEDs with the white ones:
It looks a lot better and feels a lot less harsh to the eyes in dark environments.
Quality-wise the hardware is not bad but I quickly found out the software is atrocious. What Razer calls Synapse 2.0 is one of the most obnoxious pieces of software I’ve erver used. It is large, it required me to login and it crashes half the time (the last one might be because of my environment, but everything else works fine so I won’t lose any time trying to make it work), unfortunately the macro keys, macro recording and, basically, everything macro-related doesn’t work without the software running. When selecting the backlight brightness with the combination Fn+F12 there are only OFF, DIM, NORMAL, BRIGHT and PULSATING (wich is pretty useless). In the configuration software there is a tab with a sliding trackbar control for selecting the brightness but, after selecting the desired brightness level (wich is updated immediately in the keyboard) and releasing the mouse button, the trackbar jumped to one of the predefined settings and the same happens on the keyboard. Unfortunately for me, I found out that my preferred light level to use at night under fluorescent lighting was between the “OFF” and “DIM” positions. I emailed razer support and, after a couple of emails, the final answer was:
Thank you for your patience.
We would like to clarify this further.
The lighting option cannot be adjusted to specific level of brightness like you are trying to achieve.
You are only able to use the options available – OFF, DIM, NORMAL or BRIGHT.
Hope that clarifies the matter, thank you.
Well, it became pretty “clear” that I bought a very expensive crappy product.
Not one to accept defeat easily I decided to try and implement a custom backlight controller. Fortunately it was easy to understand how they did it. Every LED’s anode is connected directly to +5V from the USB and each individual LED’s cathode has a resistor (470 ohm, if I’m remembering correctly).
The resistors are then all connected to a SOT-23 transistor that looked like a general purpose NPN with the base connected with a 10k resistor to the microcontroller (freescale MC9S08).
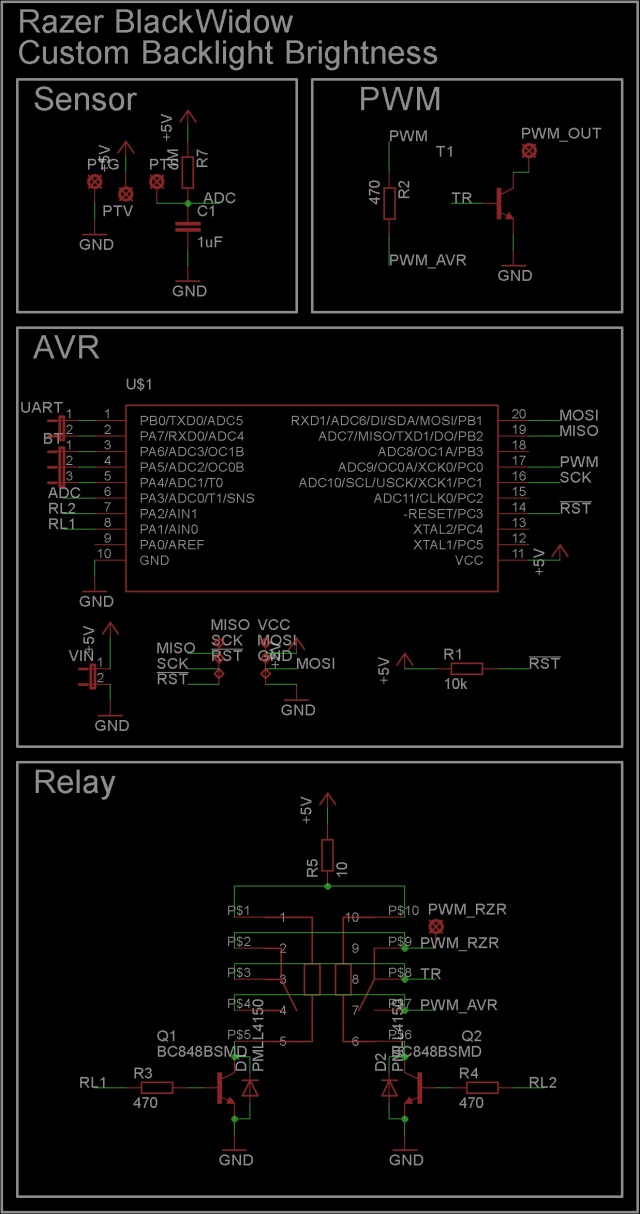
After realizing it was going to be reasonably easy easy to build a custom brightnesss controller, I found out the top cover is actually slightly translucid, that means it is possible to sense the ambient light level without using visible sensors. I made a simple PCB based on the ATtiny1634 (eagle project and source code available for download below):
The relay is latching, that means it only needs a quick pulse to change and remains stable without additional current, it is used to switch between the two sources of PWM, the one from Razer’s MCU and the AVR one. The light sensor is a common photoresistor and I used a BCP56 NPN transistor to drive the LEDs.
During the preliminary tests I realized I needed to know when the PC was off, otherwise the backlight would remain connected (I’m using the keyboard connected to a powered USB hub), for this purpose I connected a 10k resistor between the PWM signal from Razer and the AVR pin PA4, this way the microcontroller knows that if Razer’s backlight signal is disconnected the PC is turned off and it needs to drop the brightness to zero.
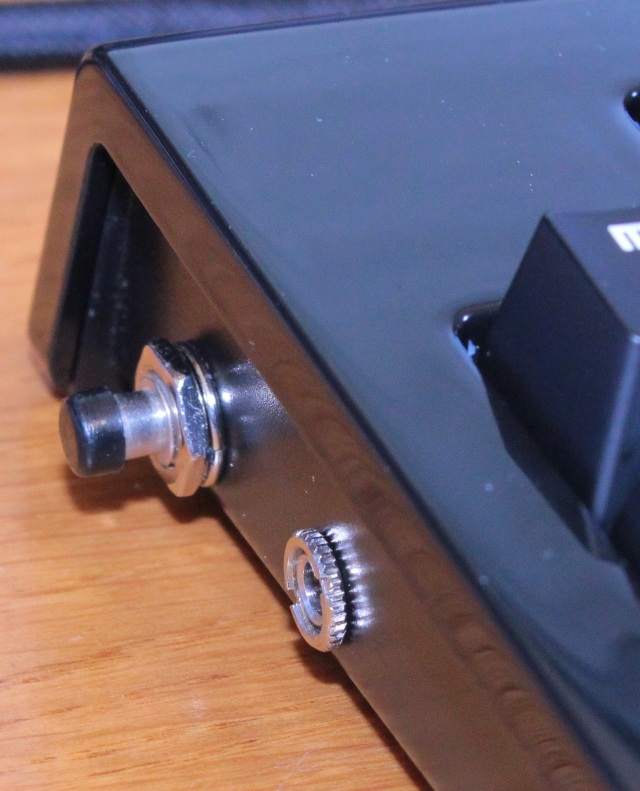
The button is used to switch between modes with a long press (automatic brightness, manual brightness and razer’s original mode). With a short press it is used to toggle the manual brightness options.
The brightness can also be configured via the AVR’s serial port, it is connected to a 3.5mm audio jack located near the button.
This is the final result:
In conclusion, if you want a backlit mechanical keyboard just buy a ducky, or deck, or something other than a Razer, the software is really bad and without it the macro keys and macro recording are useless anyway…
Eagle files for the PCB: https://dl.dropboxusercontent.com/u/32621523/publicado/razer_backlight_eagle.zip
Code: https://dl.dropboxusercontent.com/u/32621523/publicado/ATtiny1634_Iluminacao_teclado.c
LED repalcement:



That’s a great mod!
If you’re on Reddit, please stop by at /r/mechanicalkeybards!
Parabéns por o blog
Nice. I’ve been thinking of changing out the LEDs in my Logitech G11 (they don’t make it anymore but I love the macro keys) to white as well. For some reason my eyes really hate the color produced by the blue LEDs, and it always looks really blurry to me. At least Logitech’s software is a bit better than Razer’s.
Yes, blue symbols with a black background creates an awful contrast. Razer’s software is just sad, it looks like they blew 99% of the time and budget trying to make it look cool, and a week from the deadline decided it was time to try and make it work.
How were the leds changed? Im wondering because I would like to do this to a corsair k70 (which seems to fe functionally identical to a ducky shine) but want white LED’s. Were they sodered in? I know that there is a low probability of the keyboards being similar in this way but I still want to know. Thanks!
Great mod. I’ve got question please: How did you get the LED’s out of the keys? I have a Razer BW ultimate and one of the LED’s has died. I want to put a white LED into the ESC button and replace the dead LED under the 4 button with the original from the ESC.
I’ve removed the key cap and tried to use a long nose pliers to pull the LED, but it’s in there pretty firmly.
Don’t pull it without properly melting the solder, otherwise you will damage the PCB.
I used a soldering iron to melt the solder of both pins of each LED at the same time and then I pulled the old LED with small pliers. After all the LEDs were removed I cleaned the holes with solder wick. You can either use solder wick or a desoldering pump to clean the holes.
Then you just need to insert the new LEDs (respecting their polarity, otherwise they won’t light up).
If you need I can try and make a video of the process to clarify.
I made a video to better describe how I replaced the LEDs:
want to know why you had so much trouble? has the idea crossed your mind to see who owns the name *BLACKWEB*? lol will explain everything 😉
@Justin: Because I can! 😀
I don’t get what you kept talking about, though, what is a blackweb? All I found relating to that word was something relating to walmart. Is razer related to them?
Hey I was wondering if i could use audio in place of the PWM. The keyboard already has a audio plug and i’d just rewire that to connect to 10k resistor. So then leds would flash to my music. Would be a really cheap hack if it worked, a switch and couple of wires. Though i might need replace the 10k resistor with a different one. What do you think?
It should work, but depending on the source you might need to amplify the audio signal(a simple op-amp should be enough).
Instead of connecting the audio source to the transistor with a fixed 10k resistor, you could try a potentiometer, this way you easily set the sensitivity.
I would like to just make a continually variable brightness. I figured i could just use a potentiometer to easily control the voltage, and thus the brightness. Do you think it would be best for me to just remove the transistor you removed and replace it with the pot?
To “ac”:
Without PWM, with a simple resistor (or potentiometer), the LEDs could draw around 400mA at maximum brightness, that is a lot of current to put through a regular potentiometer. A better solution would be for you to use a potentiometer to drive a transistor (an NPN that can handle more than 500mA continuously) that in turn would drive the LEDs.
Check this schematic for an example:

In this case you would have to remove the driving transistor and connect the collector of the new transistor to the LEDs (in other words, connect the collector of the new transistor to where the collector of the old transistor was).
In that example i’ve used a tip120, they can handle large currents and are easy to find, but you can replace it with other NPN you have laying around.
Don’t forget the resistor between the base of the resistor and the potentiometer, otherwise you could burn either the transistor or the potentiometer if you set the potentiometer to the maximum.
Great, thank you!
Hey, is there any way of easily increasing the pwm rate of the backlight while keeping everything else the same?
By increasing the PWM rate, I’m assuming you want to increase the frequency so the blinking is less apparent.
You can try to make a frequency multiplier like this:
Click to access hcmos.pdf
But if the problem is just the blinking I would try a low pass filter between the transistor and the Razer microcontroller to smooth the PWM. See this:
http://provideyourown.com/2011/analogwrite-convert-pwm-to-voltage/
If you want to obtain a good deal from this piece of writing then
you have to apply these techniques to your won weblog.
how much would it cost to make it Red for me i would pay shoot me a price
Please elaborate, do you want a rough estimate of how much would you spend in the materials required to make a similar mod, or are you asking how much would I charge for doing it to another keyboard?
waiting for your update bro below there T_T .. 😦
Hi, can you tell us what is the problem with this issue? The light is something DIM, sometime, out of nowhere, it become light up again like normal but just for a few seconds or days..there’s no any particular behavior which will trigger this issue. Hope you can explain is it the software or the electronic things.
http://www.tomshardware.com/forum/67258-3-razer-blackwidow-ultimate-light-problem
Like this
Problem with the LEDs
Was that keyboard modified in any way?The first thing I would try would be connecting the keyboard to another computer, there is a very slim chance that the software or a USB port is acting funny.
If that doesn’t work, do you mind opening the keyboard? If so, next I would replace the transistor that drives the LEDs. Do you have access to a SOT23 NPN transistor?
The keyboard is default and never been modified before. Trying at multiple PC still the same issue.. I use this keyboard at office. Plugged in to multiple PC. Same issue. When it light up brightly, if tried on another PC, the light will stay on. Now the light is turn on for 2 days already since that I read on some forum that if you set the dim to num 3 ( brightness), it will failed.
First off kudos to you on the original mod and detailed instructions, beautiful work. I’m having the same issue as Helmi Limerance, the back light intermittently dims and after some basic troubleshooting appears to be a hardware problem.
I’m definitely not shy when it comes to opening the keyboard (I’m a 1st yr elect eng drop out ), and i’m sure I could eventually get my hands on and replace the SOT23 transistor (once I locate it on the board), just curious what else you would think to try if that does not work, or something I could try to isolate the issue without having to solder like looking for a voltage drop somewhere.
If you have an oscilloscope you can monitor the PWM signal that feeds the base of the transistor, check if it doesn’t drop when the backlight gets dimmer. Let me know what the problem was.
Hi there,
I modified my blackwidow too, but nothing compared to yours, I just changed the LEDs. But I was wondering if it would be easy to put an LED under the FN key, as it has a slot and no LED, and possible have a clear keycap so the board doesn’t look too funny. Would this be doable on the current blackwidows power supply?
I don’t really remember if the PCB has the holes for the LED under the Fn key, but if it does you can try to solder and see what happens.
Definitely has two solder spots where a machine has tried to solder something there. I’ll try it and get back to you. Any idea what keycap I should use there, seeing as it is not a standard sized keycap?
You can try to find the keycap on ebay. Ask a seller that sells cherry mx keycaps.
As a last resort you can get a very fine tip and use a dremel to remove the black rubber inside the white square 😛
I wanted to replace a few LEDs in my Blackwidow Ultimate (green) with a few other colors. Is there any particular rating I should be looking for when buying replacement LEDs? I only plan to replace a few (WASD, Escape, M1-M5, and Enter) so any help here is greatly appreciated. Thanks!
Don’t worry about it too much, the worst that can happen is the replacement LEDs be a bit brighter or a bit dimmer.
Before I post this I have to admit, you did some serious work here. If I was confident enough to do what you did I would recolor my whole keyboard! 🙂
There is a much easier way to dim the lighting. I have it so dim that I can see the letters but it is not obtrusive to anything that I do; if I’m not looking at the keyboard the lights could be assumed to be disabled, almost.
Browse to your profiles for the Black Widow, typically:
“C:\ProgramData\Razer\Synapse\Devices\BlackWidow Ultimate\Profiles”
The files here are named so you wouldn’t really guess what they’re for without knowing it’s the profile folder. Open a file and search for and change the number value to 1
I would recommend closing Synapse 2.0 while editing this file to make sure it saves; and I would also recommend having a second profile present for when Synapse 2.0 is restarted to load first. It doesn’t seem to update the 1 if that’s the same profile as it closed with active.
Hope this helps those who feel the keys are too bright in the darkness!
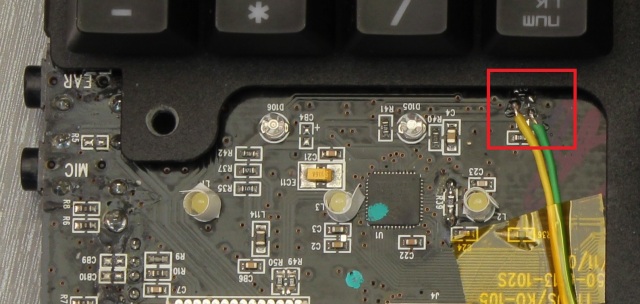
Hi, I’m trying to install LEDs into a regular blackwidow and was wondering if you would be able to tell me what this component circled in red is called? I noticed the only difference between the boards is that electric component and was wondering if that is what drive the LEDs in the BW ultimate vs the regular BW?
https://scontent-b-sjc.xx.fbcdn.net/hphotos-prn2/v/1393011_636717063996_1846897086_n.jpg?oh=27675b9c12a3d7d0541c33a313ada8f5&oe=526CC049
Hi, nope, that looks like a ceramic ceramic capacitor, probably around 10uF for the +5v bypass. That’s not critical for the LEDs. What drives the LEDs is a transistors, you can recognize it by being small, black and having 3 pins.
Does your keyboard have several resistors in the top of the PCB (between the pcb and the metal bezel that holds the cherry switches)?
You can always try and stick a 3mm led in a led slot and see if it lights up…
Hey sorry it took awhile for me to reply, its been awhile. I tried sticking in a couple LEDs but they dont light up. THere are resistors at the top, there just aren’t resistors on R6-10 but on the rest of em there are.
One question, this is the older version (not the 2013), so it should have built in 5colors per led.
Why this mod then?
Second question 😛
is this mode good for 2013 version too?
The blackwidow, like virtually all mechanical keyboards with cherry mx switches, only has 1 color. The keyboards with multi-color backlights are usually membrane keyboards.
The 2013 should be identical to this one.
I also have the Razer Blackwidow Ultimate model# RZ03-0038 and when I first bought it it had several different led colors to choose from. I know for a fact that the led’s are able to emit any color in the spectrum and is only restricted by the software itself which handles the colors. Hence this mod is really unnecessary for my keyboard. Since the software auto-updates it now only has one color which is blue (the last color I had it set to before it updated). Why in the hell did they remove the option to change the led color?
Trust me on this one Dean, you are mistaken, there was no color selection menu, you might be thinking of some of their mice. The color on the LEDs of your keyboard will definitely not change by software. There are LEDs with multiple colors, but they are completely different than these ones.
Read this, especially the “Physics” section:
http://en.wikipedia.org/wiki/Light-emitting_diode#Physics
“The wavelength of the light emitted, and thus its color, depends on the band gap energy of the materials forming the p-n junction.”
So, unless you change the physical properties of the LED chip, the color won’t change.
The only choice you had was to buy the Blackwidow Ultimate in blue, wait for the newer version in green or buy the Stealth edition in Red, there might be other versions, but I’m fairly certain they didn’t make a BW Ultimate with RGB LEDs.
Hi, I was looking the video about the led replacemente and I have a question…
What kind of LED do u use to replace the old one?
A normal LED will work? or do I have to buy some special one…
thanks in advance…
Try this website. These LEDs are replacements for most keyboards. I used these on the Razer Blackwidow Ultimate 2013 (green) and they worked perfectly.
http://www.maxkeyboard.com/keyboard-parts/led-lights.html
Thanks for the answer Nuin, I forgot to mention that I live in Argentina and it will be a little difficult to get 3mm Flangeless LEDS, do you know if a normal blue 3mm flange led would work? I’m afraid that it won’t fit it
Yes, any 3mm flangeless LEDs will fit.
I actually used regular LEDs with flanges, I got them for a very cheap price (around 3 or 4 usd for a bag of 200 with shipping included), but I had to spend half an hour in a grinder shaving the flanges so they would fit properly.
Boas José
o meu blackwidow deu o berro, e acho k foi o MC9S08JM16CGT, e está a ser dificil arranjar isto mesmo na net ele custa por volta dos 3 euros mas e portes pedem 30€.
se colocar um MC9S08JM60CGT eve funcionar na mesma certo, tem é mais memoria flash.
era só trocar e fazer correr o bootloader correcto?
obrigado.
Viva,
Caso o problema seja mesmo o microcontrolador, vai ser difícil arranjar uma cópia da flash original, provavelmente está protegida contra leitura. Nunca utilizei microcontroladores da Freescale, mas os que utilizo precisam que o bootloader seja programado (e caso assim seja com a freescale, o bootloader provavelmente também é código proprietário da razer).
ou seja se trocar o microcontrolador e depois correr o bootloader que vem dentro do Firmware updater, mesmo assim não vai adiantar?
eu tenho a certeza que é o microcontrolador porque o teclado não dá sinal de vida quando conectado ao pc, e o microcontrolador e o cristal aquecem ao ponto de queimar o dedo.
Geralmente o bootloader, mesmo que não seja integralmente proprietário, é pelo menos personalizado, caso contrário o software de atualização não sabia qual o firmware adequado para carregar e podia, por exemplo, programar o firmware de um teclado num rato (sei que pelo menos alguns ratos da razer também usam controladores da Freescale).
A não ser que arranjes uma cópia de uma flash de um teclado semelhante, diria que é improvável que esse teclado seja reparável.
Podes sempe tentar contactar a razer e pedir um orçamento para a reparação, mas também não deve ser muito fácil.
boas José
não seria possível tentares ler a tua flash? não faço ideia se é necessário um programador ou apenas conectar-lo ao pc através de usb
já tentei, a resposta é para contactar o vendedor…visto que comprei usado não adianta.
o engraçado é k tenho o blackwidow 2013 ultimate assim, e tenho um blackwidow normal dos primeiros em que a única coisa k detecta é o razer bootloader, descarrego o firmware com o firmware updater, ele diz com sucesso, contudo continua sempre na mm.
no caso do ultimate ao trocar o freescale não m importava k ele fosse detectado como um teclado normal, visto que não uso macros nem nada. tenho um colega k percebe de programação e aqui onde trabalho sou capaz de ter os programadores k me indicas t, ér o caso de arranjar um bootloader que sirva para um teclado legacy.
Toller Text. Ähnlich geil, wie das Spielen an sich. So verschrieen das
Spielen auch sei, so steht ja glücklicherweise fest, dass daddeln, eine gewisse Reife vorausgesetzt, förderlich für das Reaktionsvermögen ist.
Beim Daddeln von Computerspielen lernt der Gamer schneller als üblich Urteile zu fällen und seine Aktionen und Reaktionen zu priorisieren. Die meisten Computerspiele vermitteln zusätzlich auch Kenntnisse über
das Wirtschaften und fördern logisches Denken. Sogar
die verrissenen Multiplayer können doch nur zu oft den vorgeworfenen Effekt
des Abdriftens in eine falsche Realität}
aufhalten. Der Spielende wird wohl auch so manchen verkommenen Subjekten begegnen,
doch findet man sehr oft exakt in seinem favorisierten Game Gleichgesinnte.
Alles in allem: spielen ist hammer! Ungeachtet des Spiels und auch ob PC,Konsole,Handy,etc.
.
Hello Sir. I found your mod quite interesting. My brothers has a Zalman K500. It has kailh switches. I was wondering if I could put led lights on it. there is a hole for the led light to pass through. I dont know how to do it. My brother wants a backlighted keyboard and I dont want to spend some more money. Can you teach me how to do this? Thank you in advance 🙂
Hello, unfortunately, the switches have the holes for the LEDs but unless there is a similar model with backlight, it’s unlikely that the PCB has the LED holes. You can disassemble the keyboard and check if it does. If it does, you need to see if it’s powered, solder the LEDs and also replace all the keycaps, the keycaps you currently have probably don’t let light through.
Unless you are looking for a weekend project to pass the time, it’s probably easier to sell the keyboard you currently have and buy a backlit one. You would have to spend some money on the new keycaps anyway.
Hello. Thank you for such a great mod.
I have Razer BW 2014 Ultimate and I was a happy user of it. However, today I’ve decided to change my space key switch from Kailh to Cherry MX Green. I have successfully changed it, but when I started to test keys, it turns out that “s”, “window” and “;” are not working. I think that I burned some PCB element or maybe damaged the trace (but I cant figure out how did I manage to do it) during the soldering. I noticed on the PCB that keys didn’t have trace which connect them with other keys’ pins. Can I remove the trace protector and just directly connect the pins?
Also I’ve tried to solder the pins of the broken key with the M3 key pins, but after it when I press M3 key some other keys are activating.
Maybe you have the photo of the front of PCB, can you share it? I want to see the elements that placed on it.
P.S. Key switches are working, I tested it with continuity checker.
Hey man, love your work. I’m thinking of replicating your process but instead of replacing with a single light led, I want to replace with an RGB LED. Do u think it’s possible? I would like to upgrade my BW Ultimate to a BW Ultimate Chroma. Let me know, thanks!
Шары, вовсе не титул, гаминатор игровые автоматы.